

Avica Remote Desktop Softeware
* Secure Download
BlogEssential Online Screen Sharing Tools, Guides & Tips: A Beginners Guide
Essential Online Screen Sharing Tools, Guides & Tips: A Beginners Guide
 Emily Stewart • May 16, 2024
Emily StewartMay 16, 2024
9min read
The traditional office setting is no longer the norm with the rise of remote work and geographically disappeared teams, but there is a need for effective communication. To bridge the communication gap, several collaboration tools and screen-sharing applications have been launched. They eliminate the need for lengthy emails, endless back-and-forth explanations, and physical gathering around computers.
However, some people struggle to learn or operate such evolving online desktop-sharing technologies. Therefore, this guide brings a list of screen-sharing websites online and their stepwise guides to show you how to get the maximum out of them. So, delve into this guide to expand your knowledge of this communicative technology and streamline collaboration with teammates all over the globe.
Part 1. Know About Screen Sharing Online: Revolutionizing Communication
Simply put, screen sharing is broadcasting content from one screen to multiple other devices, even those not physically located nearby. This process is held over the Internet and enables users to share their documents, presentations, and software demonstrations with others.
During the session, participants can see on-screen happenings on the presenter’s side, including mouse movements. Besides, some online screen-sharing technologies allow presenters to control the participant’s screen to enable collaborative editing and other technical troubleshooting with complete control.
Part 2. How to Initiate Online Desktop Sharing? Discover 5 Best Tools with Guides
The question is, why do we prefer online platforms for screen sharing when desktop versions exist? As you know, some systems might not be compatible with the screen-sharing software or run out of storage, leading people to screen-share online. Considering this, the following are some screen-sharing platforms that you can count on to start your own collaborative journey.
Solution 1. Chrome Remote Desktop
Whether you need to access your work or home computer for file viewing while traveling, this dedicated screen-sharing site is a good option. The reason is its simpler operations and the latest web technologies to access and view files without running a software program on a PC. Furthermore, it has the built-in screen-sharing infrastructure of Google that uses open web technologies like WebRTC for security.
Apart from accessing others’ screens, you can share your own screen with colleagues and get help. In this regard, the Remote Support feature is used, where the process entirely relies on generating and adding code for connection. Anyhow, let’s learn how you can share your system’s screen without delving into complexities via Chrome Remote Desktop:
Step 1: Access the Chrome Remote Desktop online using your system’s browser. Then, tap the “Remote Support” tab from the left side panel and navigate to the “This Device” section. There, click the “Generate Code” button, and a code will be generated to insert into the other device for connection.

Step 2: On the remote device, enter the generated code in the “Remote Devices” section and hit the “Connect” button. Switch to your PC where you will have received a dialogue box from which you have to press the “Share” button to confirm the sharing process. Finally, your screen will be shared with the other user, who can see your complete on-screen activities.

Solution 2. Google Meet
Primarily, Google Meet is a video communication service by Google that was initially launched in 2017 but gained popularity during the COVID pandemic. It is widely used for spontaneous calls and hosting online meetings with friends and colleagues. In the direct calls, users can record the sessions, react with emojis, make breakout rooms, and chat with other participants.
In addition, it is integrated with other Google Workspace apps like Docs and Gmail to streamline smooth and engaging meetings. Using it, one can share their screens, camera, and audio to collaborate with others like you are physically present. If you want to know the operations of this free desktop sharing online, you can check the stepwise guide below:
Step 1: Start an instant new meeting on Google Meet and invite other participants via sharing a link with them. Once they join, navigate to the bottom of the screen and hit the “Present Now” button to get a new pop-up menu.

Step 2: Using the pop-up, choose which screen you wish to share from the “Chrome Tab,” “ Window,” or “Entire Screen” section. After selecting a screen, tap on it and press the “Share” button to present your screen to other meeting participants.

Solution 3. Screenleap
For quick screen sharing, Screenleap is a recommended solution because it's an online meeting software that doesn’t require installation. Additionally, it's a video conferencing software that allows you to share your camera with viewers before sharing screens. It can also record meeting sessions with the help of cloud recording and share them with others directly.
Notably, free users of this software can host 40-minute sessions per day with up to 8 meeting participants. Plus, it requires users to move to its subscription plan for controlled screen sharing, cloud recording, and other benefits. Let’s discuss its steps to achieve online screen sharing via link sharing or code-adding processes:
Step 1: Open the main webpage of Screenleap on your device and hit the “Share Your Screen Now” green button. Now, enable the computer audio and press the “Confirm Audio” button to gain another dialogue box. There, decide which screen you intend to share from the “Chrome Tab,” “Windows,” and “Entire Screen” tabs. After tapping on one screen, use the “Share” button to share the screen and move to invite others.

Step 2: On the next screen, head to the bottom-left side and get the “Share Code” to insert into the other device. Optionally, you can copy the “Invite Link” or email it from your device to invite other users to see your on-screen demonstration.

Step 3: Guide others to head to the Screenleap webpage on their devices and add the “Share Code” in the designated text box. Finally, press the “Join Meeting” button, and they can start previewing your screen on their devices.

Solution 4. Zoom Meetings
In the digital workspace, Zoom Meeting is a well-known platform for video communication and online collaboration in education or business niches. It’s an all-in-one platform that combines team chat, whiteboard, microphone, calendar, and camera. Professionals can schedule their video meetings with one tap and share content with annotations during meetings.
Also, they can access virtual whiteboards to brainstorm, create virtual backgrounds, and start Zoom Rooms to share confidential content separately with the core team. To use this free web screen-sharing, go through the steps below and begin sharing your essential content.
Step 1: Sign in to the Zoom Meeting web app using your credentials and start a new meeting. Then, invite others to the meeting by sharing the invite credentials or URL. Afterward, tap the “Share” icon at the bottom and gain another small window to pick a screen for sharing.

Step 2: There, choose a tab from the “Chrome Tab,” “Window,” and “Entire Screen” options. Later, select a screen and hit the “Share” button to let other meeting participants see your chosen screen.

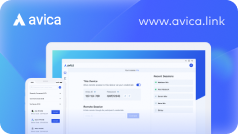
Solution 5. Avica Web App
Introducing the most effective and reliable online desktop-sharing platform, the Avica web app, which comes with end-to-end comprehensive AES-256 encryption. It allows you to access the screen of a Windows remote device where the Avica remote desktop must be installed to facilitate the process.
Users can even set their display using the auto-scaling and original ratio options for an immersive viewing experience. Also, they can optimize the speed and quality of the online screen-sharing session according to their preferences. What’s more, the Avica web app allows you to lock the remote desktop screen with just a single tap and initiate rebooting as required to their diverse needs.
Notably, users can control the remote screen after accessing it and perform various functions as if they are physically present near the remote device. Hence, Avica would be a great option beyond just accessing a screen, so you should delve into its simpler operations, which are demonstrated below.
Feel free to easily download Avica software by clicking the button below. If you require additional information about Avica product downloads, please visit the dedicated Avica download page. Rest assured, Avica guarantees safety and ensures that all products acquired from their official website or app store are free from viruses. You can confidently download Avica from these trusted sources.
Step 1: Get Avica to Allow Remote Access from the Remote Device
Download Avica’s desktop version on the Windows host device and access its Web version on the local device. Once installed on the host device, launch it and sign in with credentials to toggle the “Allow Remote Access to This Device via Your Credentials” option. Move towards the Avica web app on your local device after copying the “Avica ID” and “Password” from the host device.

Step 2: Connect Your Web App with the Remote Device Using Avica ID
On the Avica Web app, navigate to the “Connect and Control a Remote Device” to insert the “Avica ID” and hit the “Connect” button. Next, you will access another web page with the “Initiate Remote” section to add the “Avica ID” again and press the “Connect” button.

Step 3: Add a Password and Access the Remote Screen on the Web App
At last, enter the “Password” obtained from the local device and click the “Connect” button. This way, a screen-sharing session will begin, and you will access the remote device’s on-screen activities.

Part 3. Tips & Suggestions for Effective Online Screen Sharing in 2024
Imagine trying to convey a complex financial spreadsheet through a screen share web browser, and students get distracted from your messy screen or notification, breaking a learning tempo. To tackle this situation effectively, this section provides tips to elevate your screen-sharing experience and keep learners focused.
1. Turn Off Your Desktop Notifications
When a notification pops up on-screen during the meeting, the viewers' attention gets easily diverted. The first tip to obtain an immersive screen-sharing experience is minimizing the distractions for the audience. Therefore, you should disable desktop notifications before starting a meeting to maintain a professional environment. Also, you are advised to silence your mobile phone before turning on your microphone to speak.
2. Close Unnecessary Tabs or Apps
After turning off desktop notifications, you should close irrelevant tabs and software on your desktop. When specific tabs are opened only, you will get a faster processing speed and convenience to switch to your desired tab quickly. Furthermore, it will maintain privacy and prevent accidental exposure of sensitive information while maintaining professionalism during the session.
3. Use a Stable Internet Connection and a Right Platform
Since you will screen share online for free, your internet connection must be strong enough to provide a smooth and reliable experience. In this regard, you should close bandwidth-hogging applications while screen sharing and keep a backup in case your internet accidentally switches off. Apart from that, pick an application that can provide extensive collaboration features beyond just screen sharing.
4. Prepare & Practice Desktop Sharing in Advance
Test your setup in advance to ensure everything works properly so you do not face inconvenience or trouble in the sessions. During preparation, familiarize yourself with screen-sharing tools and check the mic or camera to avoid technical issues. Despite that, you can organize files and icons to navigate quickly in the meeting without fumbling for the correct document.
Conclusion
To summarize the discussion, this article showed you some of the leading screen-sharing websites and their stepwise operational guides. Upon reading, you are aware enough to pick a platform that resonates with your needs and offers simpler operations according to your technical knowledge. If you need expert advice, try the Avica web app to screen share online due to its security and ease of accessing other devices' screens.
On this page
You May Also Like

COMPARISION
The 7 Top Screen Mirroring Apps for Your PC: Ultimate Guide
Emily Stewart
Jul 26, 2024
9min read

COMPARISION
5 Hidden Samsung Screen Mirroring Apps of 2024: A Review to Consider
Emily Stewart
Jul 19, 2024
8min read

COMPARISION
The 5 Best Remote Desktop Apps for iPad in 2024
Emily Stewart
May 24, 2024
7min read
